

Beyond a cup or two of black coffee, I am not a breakfast person. I love many breakfast foods—frittatas, oatmeal, omelets, waffles, biscuits and gravy. I just prefer them at any other time of day, especially late at night when I come home from work. As for waffles, I never even noticed them. Even in college during late-night study sessions at Waffle House, I never sampled their namesake. It wasn’t until I was living in Germany and a friend invited me over one afternoon for coffee that I experienced my first real, from scratch, waffle. They were leavened the traditional way with whipped egg whites, topped with a sprinkling of powdered sugar and a few tiny jewel-like strawberries straight from the farmers market. Delightful!
Over the years, I have wandered through a few waffle phases—the most recent being a series of sweet-potato waffles cooked in my fireplace with a rather ancient long-handled waffle iron I stumbled upon at a flea market. As a chef, you never know where inspiration might come from. A part of the inspiration for this recipe came from seeing sad, neglected, and usually in-like-new-condition waffle irons at every estate sale I’ve ever been to—and I do love a good estate sale. My “modern” electric waffle iron (it’s surely at least 35 years old) came from one such sale—$1.50 well spent. Even more inspiration came from a used cookbook I purchased sometime in the late nineties, recently rediscovered, that I couldn’t have ever opened more than once or twice in decades. It was written by then unknown Dorie Greenspan (now a famous and prodigious cookbook author and food writer), and it contains recipes for countless waffles, including some made with cornmeal, and one made with a favorite food of mine—polenta. The wheels began turning and I knew it was time to dust off the waffle iron.
This recipe is versatile. I have written it as a savory waffle, welcome at any mealtime, in any season. The sauce I have included could easily be switched to another. In fact, the sauce could be eliminated entirely, replaced with some berries and a drizzle of honey and yogurt for a sweet version, much like my first experience with waffles. The important thing is to get out your neglected waffle maker (or visit an estate sale and rescue someone else’s), fire it up, and create your own breakfast any time of day.
Crispy Polenta Waffles
Begin by making the polenta. In a small saucepan, combine 2 cups of cold water with 1/3 cup coarse polenta (I prefer Bob’s Red Mill “Corn Grits also known as Polenta,” 1 teaspoon of salt, 1 tablespoon of extra-virgin olive oil, and a bay leaf. I feel strongly about the use of a bay leaf in polenta (see In the Pantry), so much so that I can’t imagine really good polenta without it. Whisk all of this together and bring to a simmer, cooking and stirring occasionally for about 15 minutes, until the polenta thickens but is still loose like a batter. Remove the pan from the heat, whisk in 2 tablespoons butter, and allow the polenta to cool a bit while assembling the rest of the ingredients. Remove the bay leaf and discard it. Crack 2 eggs into the polenta and whisk them in. Add 1/2 cup all-purpose flour and 1 teaspoon baking powder and whisk again. Finally stir in 1/3 cup grated hard cheese like Grana Padano or Parmigiano-Reggiano. Taste, adjusting salt if necessary, and adding a grind or two of pepper if you wish. Preheat your waffle iron now.
With spring in the air, I think a nice, light vegetable ragu with mushrooms and asparagus and a poached egg makes a perfect topping for your polenta waffle. For the ragu, preheat a large skillet. Slice about 8 ounces of fresh mushrooms, 2 cloves of garlic, and a small shallot (optional, but nice). When the skillet is hot, add a generous drizzle of oil and begin cooking half the mushrooms in a single layer—not crowded, so they are able to release a bit of moisture and caramelize. Sprinkle lightly with salt. While the mushrooms cook, snap the tough ends off a half bunch of asparagus (discarding the tough ends), and cut the asparagus on the bias into smaller pieces. Check on the mushrooms, occasionally tossing to cook on both sides. When the mushrooms are lovely and golden brown, remove them to a plate, add the remaining mushrooms to the skillet (with a splash more oil if needed) and continue cooking until they are equally beautiful, and your kitchen smells earthy and delicious. When the remaining mushrooms are cooked, remove them to the plate. Add a little oil or butter to the skillet and sauté the garlic and shallot (if using). When the garlic begins to turn golden on the edges, add the asparagus spears and a tablespoon or two of water and immediately cover the pan to briefly steam the asparagus. For freshness, slice a few scallions the same size as your asparagus and add them and a dusting of herbs (I like thyme and sage, maybe a little marjoram) to the skillet. Season generously with salt and pepper and toss everything together, adding a splash of water if needed to keep things from scorching. When the asparagus is tender but still bright green, turn off the heat. If serving the waffles with poached eggs, be sure to have a little pan of water on to boil.
To cook the waffles, have the waffle iron preheated and lightly buttered or sprayed with non-stick spray. The batter can be poured directly onto the griddle and cooked, but for an extra crispy exterior, I have a little trick. I like to turn the waffle iron upside down and sprinkle the upper interior surface (which is now facing up) with a scant tablespoon of grated hard cheese and a similar amount of corn meal (not the coarse polenta, which is too coarse). It should begin to cook with the cheese beginning to melt and stick to the iron. I immediately turn the iron right-side-up and sprinkle the bottom surface with the cheese and cornmeal. Then I spread the batter (my iron holds about ¾ cup—yours might hold a little more or less) on the iron and close the lid. Cook the waffle until both sides are a lovely golden brown, tapping the surface to check that it is crisp. This will take several minutes. I find the temperature light on the iron an unreliable indicator of doneness for this type of waffle, so I generally ignore it. If preparing multiple waffles, have an oven preheated to its lowest setting with a sheet pan and a rack waiting to receive the waffles (putting them on a rack instead of directly on the pan will help to keep them crisp on the bottom side). Remove the crispy waffle to the rack and continue cooking as many waffles as you need. If the waffles stick, it simply means that you are a bad person, and you must deal with the consequences. When ready to serve, top each waffle with some of the vegetable ragu, a poached egg or two, and some shavings of cheese.
In Your Pantry
Bay Leaves
You’ve probably got some bay leaves in the back of your pantry at this very moment. Do you really know how to use them, and if they’ve been there for years, do you want to? Bay Laurel (aka laurus nobilis) is the unsung hero of many soups, sauces, stews, and marinades, providing subtle herbal notes and comforting aromas of menthol and eucalyptus. There are a number of varieties of bay tree around the world and knowing the type you have is important. In most western cuisines, the Turkish bay leaf is the ideal for cooking.

Fresh Bay Leaf
Bright and menthol-y when first heated, fresh bay leaf emits resinous notes of citrus and sunshine that mellow considerably during cooking. In this country, many fresh bay leaves sold in grocery stores are California bay leaves (aka umbellularia californica). This longer, skinnier leafed variety has a much higher eugenol content (the menthol/eucalyptus compound that can easily overwhelm a dish and even seem bitter) The more rounded, oval Turkish leaf (pictured) has a more subtle, complex, and lasting flavor. To be certain you’re getting real Turkish bay laurel for fresh use, try growing your own. It makes a very stately houseplant. Use in any recipe calling for bay leaf, especially those with longer cooking times.
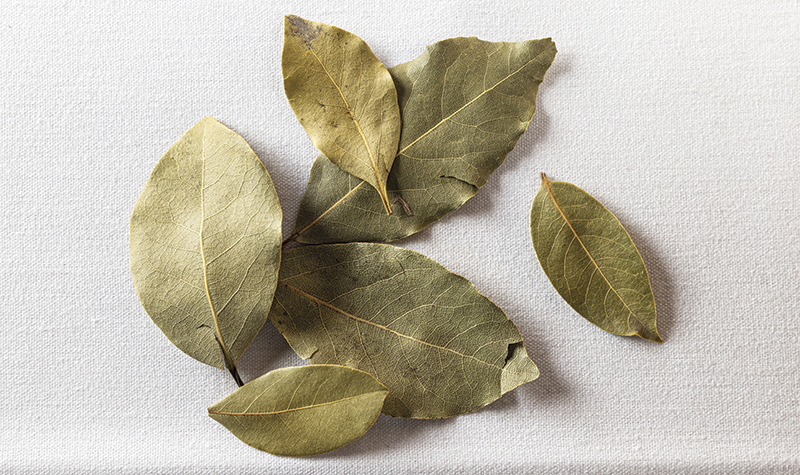
Dried Bay Leaf
Turkish bay leaf, when dried, achieves a robust and complex flavor. Just remember, dried bay leaves keep for months, not years, and over time the flavor fades and becomes musty. To store dried leaves for an extended period, try freezing them in an airtight container. Always remove the whole leaves before serving as they can become a choking hazard or digestive obstacle.
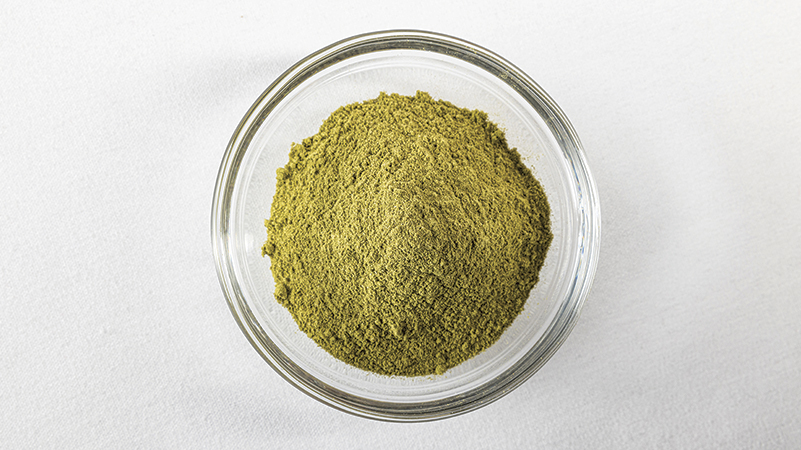
Ground Bay Leaf
Great for making spice blends, dry rubs, and marinades, or any time you don’t want to worry about whole leaves or pieces in a finished dish. Try skewers of liver and onions, dusted with powdered bay leaf and black pepper, then grilled, or a skillet of shrimp, cherry tomato, and zucchini dusted with bay and broiled. Note, the ground leaf is highly perishable, so it is best stored in an airtight container in the freezer.